While using Quicken there are chances you may encounter some technical connectivity problems which leads to Deactivate and Reactivate Quicken account.
In this post, we’ll discuss about the deactivation and reactivation of an account in Quicken for Windows and Mac.
List of some errors when you require to deactivate and reactivate the account.
Things to do before starting with the further process
1. Create a data file backup
- Go to File > Backup and Restore
- Click Backup Quicken File…
- Click on Change… to create a backup on the other location otherwise click Back up Now
2. Update Quicken to the latest release
- Go to Help > Check for Updates
- Click Yes, if an update is available to download
Simple Methods to Deactivate and Reactivate Quicken Account
Before you deactivate an account in Quicken for Windows it’s best to turn off automatically add the transactions to the banking register feature that helps to avoid the duplication of transactions into the account.
To do that:
- Go to Edit > Preferences…
- Click on Downloaded Transactions
- Now unchecked the Automatically add to banking registers
- Then click OK
Windows
Deactivate Account
- Click on the account from the account bar
- Now click on the top-right gear icon with a drop-down arrow
- Click Edit account details
- Click the Online Services tab
- Now click on Deactivate
- Then click Yes
- Now click OK and Done
Reactivate Account
- Now go to Tools > Add Account…
- Choose the type of account such as Checking, Savings, etc.
- Now type the name of your bank/financial institution
- Now enter the Username and Password that you use to login to your bank’s website
- Then click Connect
- Quicken may take some time to pull up bank accounts
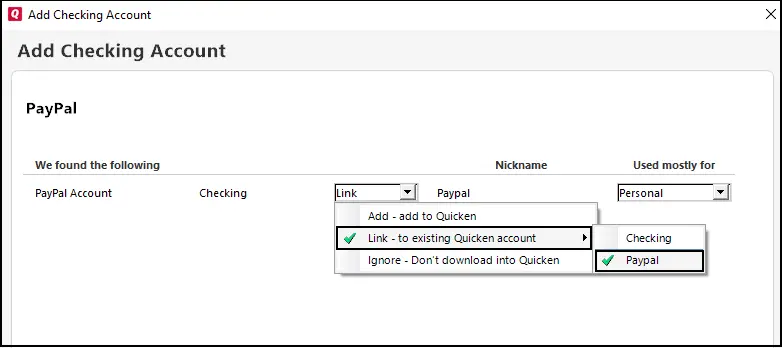
- Once it shows you the list of accounts, ensure to LINK it with the existing account that you already have in Quicken. (See an image below)
Mac
Deactivate Account
- Open Quicken
- Click on the Account name
- Click on the Settings at the bottom right side corner
- On the next screen click on Troubleshooting
- Click on Deactivate Downloads
- Now click on Save
Reactivate Account
- Select the Deactivated account
- Click on the Settings at the bottom right side corner
- Click on the Setup Transaction Download
- Now type the name of your financial institution
- Enter your bank Username and Password
- In the process to reactivate the account Quicken will show you your account information make sure to LINK your account instead of adding it again.
If you were getting an error message or unable to update the accounts and followed the above instructions to deactivate and reactivate the account in Quicken, try to perform the one-step update again to make sure that accounts downloading banking transactions without any trouble.
After following all the above methods if you still face the same problem, you can speak with TheSupportZone expert for a quick resolution. Dial our customer care number or leave us your message.